Proxima [1879587] —
Original article
If you're thinking of building a Christmas Town map, read Proxima's handy guide explaining how to use the Christmas Town Map Editor.
The Christmas Town map editor has been available for a few weeks now, and some players have already started making their own worlds for others to explore. However, the complex nature of the Map Editor might appear intimidating to some at first, so if you're interested in building something but don't know where to start, Proxima has provided this helpful guide to Christmas Town map creation.
Creating a Map
To begin with, you'll need to create a new map to edit. Visit the Christmas Town page here and click Create New Map. Give it a name and then click Map Editor.
The Map Editor will look something like the image below when you first load it, although the Objects, Parameters, Blocking and Areas tabs have been replaced by icons which look like this now.

The last three icons represent Areas, History and Backups. But don't trouble yourself with any of that just yet, because we're going to start simple. Adding objects to a map is how you build your world, so let's do that first.
Adding Objects

Go to the objects tab and find something you want to place down on the map by searching through the various categories. Click on an object to select it, and then click on a position in the map to place. Easy!
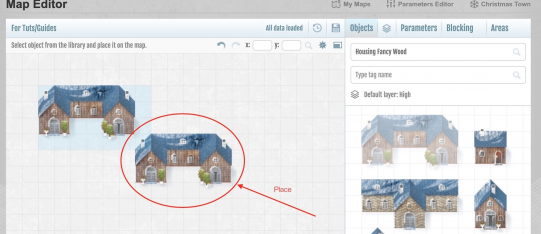
You can add multiple versions of the same object in a row if you like, and when you're done, simply right-click to cancel. Drop one house onto the map and you have an isolated little home. Drop several, and you're on your way to building a village. The Map Editor has a plethora of different types of objects with a range of different themes. It's a good idea to browse the available objects first, and then figure out what kind of map you want to make.
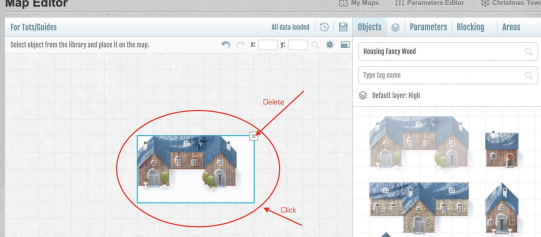
Of course, at some point, you'll change your mind, or make a f**k up. Objects can't be moved once placed, so to delete an object, first, you should deselect any currently selected object to ensure you don't remove the wrong thing. Do this by clicking the selected object in the object panel, or right-clicking. Once you've done this, you'll be able to choose any placed object on your map and it will give the ability to delete the object.
Blocking
Blocking allows you to control where a User is allowed to walk in the map. You might build walls and rivers, but these objects do not inherently prevent someone from traversing them. Perhaps this is your map:

You want a User to stick to the path in the middle, rather than walk in the river either side of it. So select the blocking tab, and click on the "Line" block.

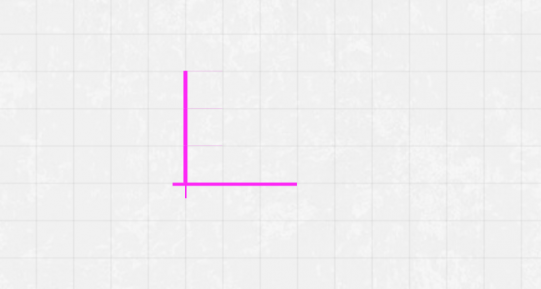
You will then be able to hover over tiles in your map, and a Pink outline will show you edges you can select to block. If placed, a User will not be able to walk through these lines (which are invisible when not in the blocking panel).
The "Corner" clocker allows you to block the corner of your map, such that a user will not be able to cut diagonally across a tile. There are also two eraser options if you wish to remove blocking from your map - this won't affect the objects you've placed.
Copying and Pasting
Chedburn has made it clear that this editor is not designed for mass-production of large areas very quickly, as that can lead to laziness and low-quality maps. However, it is possible to speed up the process of putting down objects if you need a large area covered in the same material. To do this, you can use the Copy and Paste feature.

With several objects near each other, ctrl+click on the top left corner, and then drag over an area of objects that you want to select. Once you have several objects selected, you can "copy them" with ctrl+c (or cmd+c for mac users), and then place this group of objects on the map!
Grouping and Layering
With the basics covered, you might want to start thinking about how you want your map to look, and this means considering the order in which you layer, or place objects on top of one another.
For example, if you want to have a river or body of water, these should be the very first blocks that you place. The reason for this is demonstrated below:


If you're using curved pieces as we've done in the example above with the path, your map may end up looking rather blocky if you try and place a square river tile on top of it.
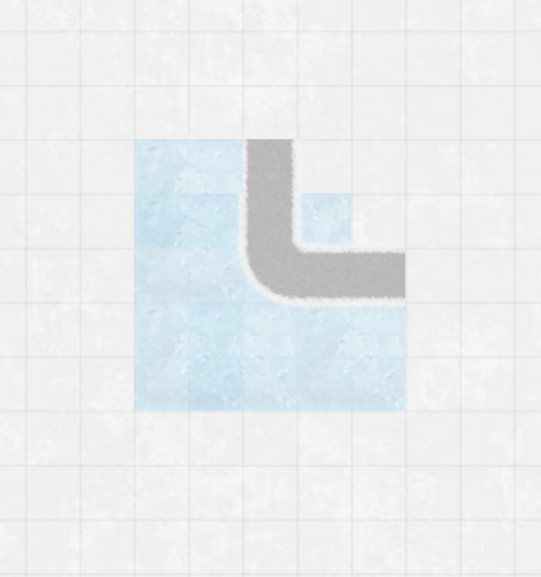
Placing the river down first with a curved path on top means the pieces work naturally together. You can also use different objects layered beneath the water tiles to create other effects. For example, the black tiles under the Rivers category can be used as a background, allowing you to create a "dark water" effect.


The correct use of layers is important if you want to achieve effects such as snowy or icy paths, like in the example below.
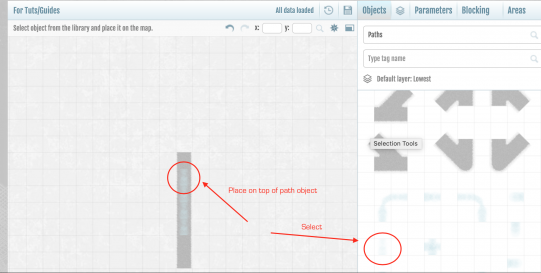
Layering is made a lot easier using the "Groups" panel, where several objects can be moved above or below their current layer at once. For example, you can place a load of different types of "Ground" objects down for a floor, and then select them all in the Groups panel, where you can view where every object in your selection is based on its layer priority. You can then change the group's layer priority to whatever makes sense or looks the best.

In the gif above, I placed down some small white squares, and then some big grey and blue tiles on top of them. Since Ground objects have a default "Lowest" layer setting, the most recently placed object is what you will see (the blue and grey). I then select some of the (hidden) white objects in the Group panel and change their setting to "Highest", making them visible as they now stack above all other objects.
One thing to be careful with the layering function is the placement of "User", which represents whoever is going to be playing your map. Since you won't want your User to walk "underneath" a floor object, you should take care to make sure the User resides in the correct place at all times (in this case, they should be at the top).

Default Parameters
The creation of parameters will be covered below in "Parameter Editing", but first, let's explain what these things are. The Parameters panel allows you to assign certain actions to certain coordinates on your map, and these can be placed in the same way objects are. Here are some of the Parameters you can add.
SP - Spawn
This allows you to select a marker where you'd like Users to spawn in the map.

SP - Spawn chest points
These allow chests to spawn on the tiles where they are placed.
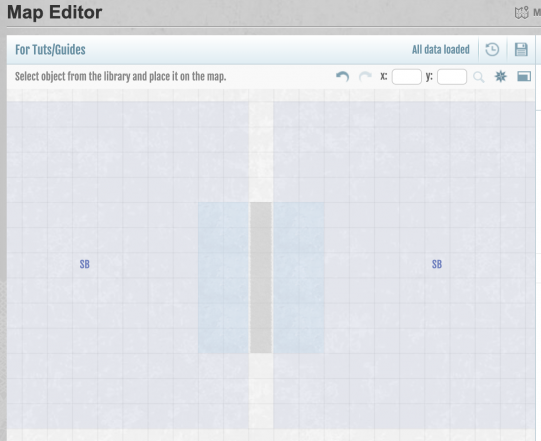
SB - Spawn Blocker
These define the centre of a 13x13 grid in which items will not be able to spawn. These are useful to stop items spawning in impossible to reach places, such as beyond cliff edges and in inaccessible rivers!
FAS - First Aid Spawn
These are where a User will "wake up" after being hospitalised. These are necessary to have if you want to hospitalise a User with your own defined Parameters later on. You can gloss these up with a First Aid Tent object nearby!

This is probably a good point to explain how to use Map Coordinates too. The x and y axes are used to assign coordinates to each square on the map. The map is a 200x199 grid ranging from x = 0 to 199, y = -99 to 99. In the editor, you can simply enter the coordinates for any particular section in the box shown below, and this will instantly transport you to that section of your map.

If you have any ultra-specific Parameters you'll need to find later on, it's a good idea to note down their coordinates and write them in their name. This can be done in the Parameter Editing tab.
Parameter Editing
In addition to spawning users and chests, Parameters allow you to define what happens on any particular tile. This could be flavour text, jailing or hospitalising a User, or even mini-games. Here are some Parameters you'll likely want to use, and why you'll want to use them.
Running and Walking
While there is a default pace for all players to walk at, you can increase or decrease the speed at which they move in certain areas if you wish. This can be used to make a player walk slowly and tentatively across a piece of ice, or rush quickly down a scary corridor - use these commands sparingly, though.

To change walking speeds in one particular area, give your parameter a name, a code, and a colour (like above - Spawning was called "Spawn", code "SP" and colour black). Then define the text you want to appear on the tile this parameter is placed on. For running, adding the text "You run {direction}" will print the actual direction a User is moving across the tile!
Select "speed" from the dropdown list on the right-hand side, and then you can choose how fast you want a User to move while on this tile. 2 is the highest setting and the one I have opted for.
The QTY field above the dropdown list can be left as 1 for this. Click Save!

First Aid and Jailing Zones
Suppose you want to make someone go to the first aid tent. As discussed above, you must have an FAS (First Aid Spawn) to be able to do this. When you have one set up, you can do something like this:

This parameter has two branches. In one, the user will slip over and be sent to hospital. In the other, they will walk very slowly across the tile. To send them to the hospital, select "firstAidArea" from the trigger menu. To slow a user down, select "speed" and then choose how fast to make them go. Add some flavour text, and then there's only one more thing to do; define the probability of sending them to hospital!
In my image, I have "Slip" set to 1, and "Tread carefully" set to 9. This means that 9 times out of every ten (1+9) the User will tread carefully, while 1 time out of every ten (1+9) they will fall and be sent to the first aid tent.
These same principles apply to Jailing.
Teleporting
It is possible to teleport Users across the map! There are a couple of ways to do this...

Using the "teleport" trigger you can add flavour text and enter the coordinates "x,y" of where you would like a user to teleport TO. If you enter multiple coordinates, separated by a semi-colon, it will alternate the exit path.
[Another way to teleport users is with the "teleportIn" and "teleportOut" triggers.] [maybe not, currently not working].
Gates

The gateControl trigger allows you to select an "Active Time" - this is the time that a gate will remain open after a User walks across the gateControl tile. You can also select a control radius, a square block within which the gateControl will open all gates. It's important to realise that for the radius you select, wherever you place your parameter will define the centre of this area - so if you select 9x9, you can't place a gate 5 or more blocks away in either direction.
Gates are Objects like these...

...and if you place a gateControl parameter down...(7,5)

Next, you can think about allowing a User to only walk through the gate after opening it. If you have a gateControl parameter placed within the correct radius, a User will not be able to walk from a gateInner tile to a gateOuter tile unless the gateControl is activated, and vice versa. You can set up something like the following to have a working gate!

Minigames
There are a number of mini-games you can add to the map, using parameters:

You'll need to decorate the area you place these parameters with the relevant objects, though, since they're invisible by themselves.
Special Text Commands
Direction
Using "{direction}" in the text field will print the direction a user moves across this tile. For example, a parameter with "You run {direction}" would print "You run North" for a user moving north across the tile.
There are plans to make {Player} an available command, to print a user's name on the tile.
Further Reading
If you'd like to read further instructions on how to use the Christmas Town Map Editor, please follow Proxima's thread in the Christmas Town forum here.
Creating a Map
To begin with, you'll need to create a new map to edit. Visit the Christmas Town page here and click Create New Map. Give it a name and then click Map Editor.
The Map Editor will look something like the image below when you first load it, although the Objects, Parameters, Blocking and Areas tabs have been replaced by icons which look like this now.
The last three icons represent Areas, History and Backups. But don't trouble yourself with any of that just yet, because we're going to start simple. Adding objects to a map is how you build your world, so let's do that first.
Adding Objects
Go to the objects tab and find something you want to place down on the map by searching through the various categories. Click on an object to select it, and then click on a position in the map to place. Easy!
You can add multiple versions of the same object in a row if you like, and when you're done, simply right-click to cancel. Drop one house onto the map and you have an isolated little home. Drop several, and you're on your way to building a village. The Map Editor has a plethora of different types of objects with a range of different themes. It's a good idea to browse the available objects first, and then figure out what kind of map you want to make.
Of course, at some point, you'll change your mind, or make a f**k up. Objects can't be moved once placed, so to delete an object, first, you should deselect any currently selected object to ensure you don't remove the wrong thing. Do this by clicking the selected object in the object panel, or right-clicking. Once you've done this, you'll be able to choose any placed object on your map and it will give the ability to delete the object.
Blocking
Blocking allows you to control where a User is allowed to walk in the map. You might build walls and rivers, but these objects do not inherently prevent someone from traversing them. Perhaps this is your map:
You want a User to stick to the path in the middle, rather than walk in the river either side of it. So select the blocking tab, and click on the "Line" block.
You will then be able to hover over tiles in your map, and a Pink outline will show you edges you can select to block. If placed, a User will not be able to walk through these lines (which are invisible when not in the blocking panel).
The "Corner" clocker allows you to block the corner of your map, such that a user will not be able to cut diagonally across a tile. There are also two eraser options if you wish to remove blocking from your map - this won't affect the objects you've placed.
Copying and Pasting
Chedburn has made it clear that this editor is not designed for mass-production of large areas very quickly, as that can lead to laziness and low-quality maps. However, it is possible to speed up the process of putting down objects if you need a large area covered in the same material. To do this, you can use the Copy and Paste feature.
With several objects near each other, ctrl+click on the top left corner, and then drag over an area of objects that you want to select. Once you have several objects selected, you can "copy them" with ctrl+c (or cmd+c for mac users), and then place this group of objects on the map!
Grouping and Layering
With the basics covered, you might want to start thinking about how you want your map to look, and this means considering the order in which you layer, or place objects on top of one another.
For example, if you want to have a river or body of water, these should be the very first blocks that you place. The reason for this is demonstrated below:
If you're using curved pieces as we've done in the example above with the path, your map may end up looking rather blocky if you try and place a square river tile on top of it.
Placing the river down first with a curved path on top means the pieces work naturally together. You can also use different objects layered beneath the water tiles to create other effects. For example, the black tiles under the Rivers category can be used as a background, allowing you to create a "dark water" effect.
The correct use of layers is important if you want to achieve effects such as snowy or icy paths, like in the example below.
Layering is made a lot easier using the "Groups" panel, where several objects can be moved above or below their current layer at once. For example, you can place a load of different types of "Ground" objects down for a floor, and then select them all in the Groups panel, where you can view where every object in your selection is based on its layer priority. You can then change the group's layer priority to whatever makes sense or looks the best.
In the gif above, I placed down some small white squares, and then some big grey and blue tiles on top of them. Since Ground objects have a default "Lowest" layer setting, the most recently placed object is what you will see (the blue and grey). I then select some of the (hidden) white objects in the Group panel and change their setting to "Highest", making them visible as they now stack above all other objects.
One thing to be careful with the layering function is the placement of "User", which represents whoever is going to be playing your map. Since you won't want your User to walk "underneath" a floor object, you should take care to make sure the User resides in the correct place at all times (in this case, they should be at the top).
Default Parameters
The creation of parameters will be covered below in "Parameter Editing", but first, let's explain what these things are. The Parameters panel allows you to assign certain actions to certain coordinates on your map, and these can be placed in the same way objects are. Here are some of the Parameters you can add.
SP - Spawn
This allows you to select a marker where you'd like Users to spawn in the map.
SP - Spawn chest points
These allow chests to spawn on the tiles where they are placed.
SB - Spawn Blocker
These define the centre of a 13x13 grid in which items will not be able to spawn. These are useful to stop items spawning in impossible to reach places, such as beyond cliff edges and in inaccessible rivers!
FAS - First Aid Spawn
These are where a User will "wake up" after being hospitalised. These are necessary to have if you want to hospitalise a User with your own defined Parameters later on. You can gloss these up with a First Aid Tent object nearby!
This is probably a good point to explain how to use Map Coordinates too. The x and y axes are used to assign coordinates to each square on the map. The map is a 200x199 grid ranging from x = 0 to 199, y = -99 to 99. In the editor, you can simply enter the coordinates for any particular section in the box shown below, and this will instantly transport you to that section of your map.
If you have any ultra-specific Parameters you'll need to find later on, it's a good idea to note down their coordinates and write them in their name. This can be done in the Parameter Editing tab.
Parameter Editing
In addition to spawning users and chests, Parameters allow you to define what happens on any particular tile. This could be flavour text, jailing or hospitalising a User, or even mini-games. Here are some Parameters you'll likely want to use, and why you'll want to use them.
Running and Walking
While there is a default pace for all players to walk at, you can increase or decrease the speed at which they move in certain areas if you wish. This can be used to make a player walk slowly and tentatively across a piece of ice, or rush quickly down a scary corridor - use these commands sparingly, though.
To change walking speeds in one particular area, give your parameter a name, a code, and a colour (like above - Spawning was called "Spawn", code "SP" and colour black). Then define the text you want to appear on the tile this parameter is placed on. For running, adding the text "You run {direction}" will print the actual direction a User is moving across the tile!
Select "speed" from the dropdown list on the right-hand side, and then you can choose how fast you want a User to move while on this tile. 2 is the highest setting and the one I have opted for.
The QTY field above the dropdown list can be left as 1 for this. Click Save!
First Aid and Jailing Zones
Suppose you want to make someone go to the first aid tent. As discussed above, you must have an FAS (First Aid Spawn) to be able to do this. When you have one set up, you can do something like this:
This parameter has two branches. In one, the user will slip over and be sent to hospital. In the other, they will walk very slowly across the tile. To send them to the hospital, select "firstAidArea" from the trigger menu. To slow a user down, select "speed" and then choose how fast to make them go. Add some flavour text, and then there's only one more thing to do; define the probability of sending them to hospital!
In my image, I have "Slip" set to 1, and "Tread carefully" set to 9. This means that 9 times out of every ten (1+9) the User will tread carefully, while 1 time out of every ten (1+9) they will fall and be sent to the first aid tent.
These same principles apply to Jailing.
Teleporting
It is possible to teleport Users across the map! There are a couple of ways to do this...
Using the "teleport" trigger you can add flavour text and enter the coordinates "x,y" of where you would like a user to teleport TO. If you enter multiple coordinates, separated by a semi-colon, it will alternate the exit path.
[Another way to teleport users is with the "teleportIn" and "teleportOut" triggers.] [maybe not, currently not working].
Gates
The gateControl trigger allows you to select an "Active Time" - this is the time that a gate will remain open after a User walks across the gateControl tile. You can also select a control radius, a square block within which the gateControl will open all gates. It's important to realise that for the radius you select, wherever you place your parameter will define the centre of this area - so if you select 9x9, you can't place a gate 5 or more blocks away in either direction.
Gates are Objects like these...
...and if you place a gateControl parameter down...(7,5)
Next, you can think about allowing a User to only walk through the gate after opening it. If you have a gateControl parameter placed within the correct radius, a User will not be able to walk from a gateInner tile to a gateOuter tile unless the gateControl is activated, and vice versa. You can set up something like the following to have a working gate!
Minigames
There are a number of mini-games you can add to the map, using parameters:
You'll need to decorate the area you place these parameters with the relevant objects, though, since they're invisible by themselves.
Special Text Commands
Direction
Using "{direction}" in the text field will print the direction a user moves across this tile. For example, a parameter with "You run {direction}" would print "You run North" for a user moving north across the tile.
There are plans to make {Player} an available command, to print a user's name on the tile.
Further Reading
If you'd like to read further instructions on how to use the Christmas Town Map Editor, please follow Proxima's thread in the Christmas Town forum here.
Original article
Comments
Post a Comment